Audit Definition Editor
Audit Definition Editor · Find And Batch Editor
The Audit Definition Editor is used to create and modify audit rules.
Rules are organised in a hierarchical structure that defines how each row in the grid is evaluated.
This page describes the user interface used to create audit rules.
For detailed explanations of the underlying logic, see the Core Concepts pages:
Audit Tree
The Audit Tree defines the structure of the entire audit system.
The hierarchy is organised as follows:
Group
└─ Subject
  └─ Match
    └─ Target
      └─ Condition
Each node represents one stage of the auditing process.
Under each Group node are the Subject nodes loaded from the corresponding .aud files.
Because these files are read directly from disk, Subject nodes are currently displayed in alphabetical order and cannot be reordered.
Each node contains its own nested collection:
- Group → collection of Subjects
- Subject → collection of Matches
- Match → collection of Targets
- Target → collection of Conditions
Node Management
Right-clicking any node opens a context menu.
Available actions include:
- Add
- Cut
- Copy
- Paste
- Delete
Actions are enabled or disabled depending on the selected node type.
The Add and Delete buttons below the tree provide quick access to these actions.
Reordering
Nodes can be reordered by drag-and-drop.
This applies to all node types except Subject nodes, which follow file order.
In versions later than 2.1.0, a Subject nodes have a
Prefixproperty, which alters their alphabetical order without affecting theSubjectColumn.
Re-ordering a node will affect the order in which it is processed. Audits higher up are processed before nodes below.
- Match nodes always work on a first-match basis, so order is critical.
- Target nodes are all processed in order, so ApplyMode should be used to determine how latter nodes can affect existing flags.
Copy and Paste
Nodes may be copied or moved to other compatible locations in the tree.
This is useful when creating similar rules that only require minor adjustments.
Important notes:
- Nodes can only be pasted into adjacent or compatible parent types
- Duplicate nodes are not allowed when saving
- However duplication during editing is supported so nodes can be copied and modified
At present, copy and paste operations are limited to the current editor instance.
Node Display
Each node displays important information directly in the tree.
This allows the structure of the audit to be understood at a glance.
Subject Nodes
Display:
- the subject property name
- the number of Match nodes
Icons differ depending on the match flag behaviour:
| Icon | Value |
|---|---|
 |
Okay |
 |
Info |
 |
Warn |
 |
Error |
 |
Unknown |
 |
None |
Match Nodes
Display:
- the match property
- the number of Target nodes
Icons differ depending on the match type:
| Icon | Value |
|---|---|
 |
Exact |
 |
Like |
 |
Regex |
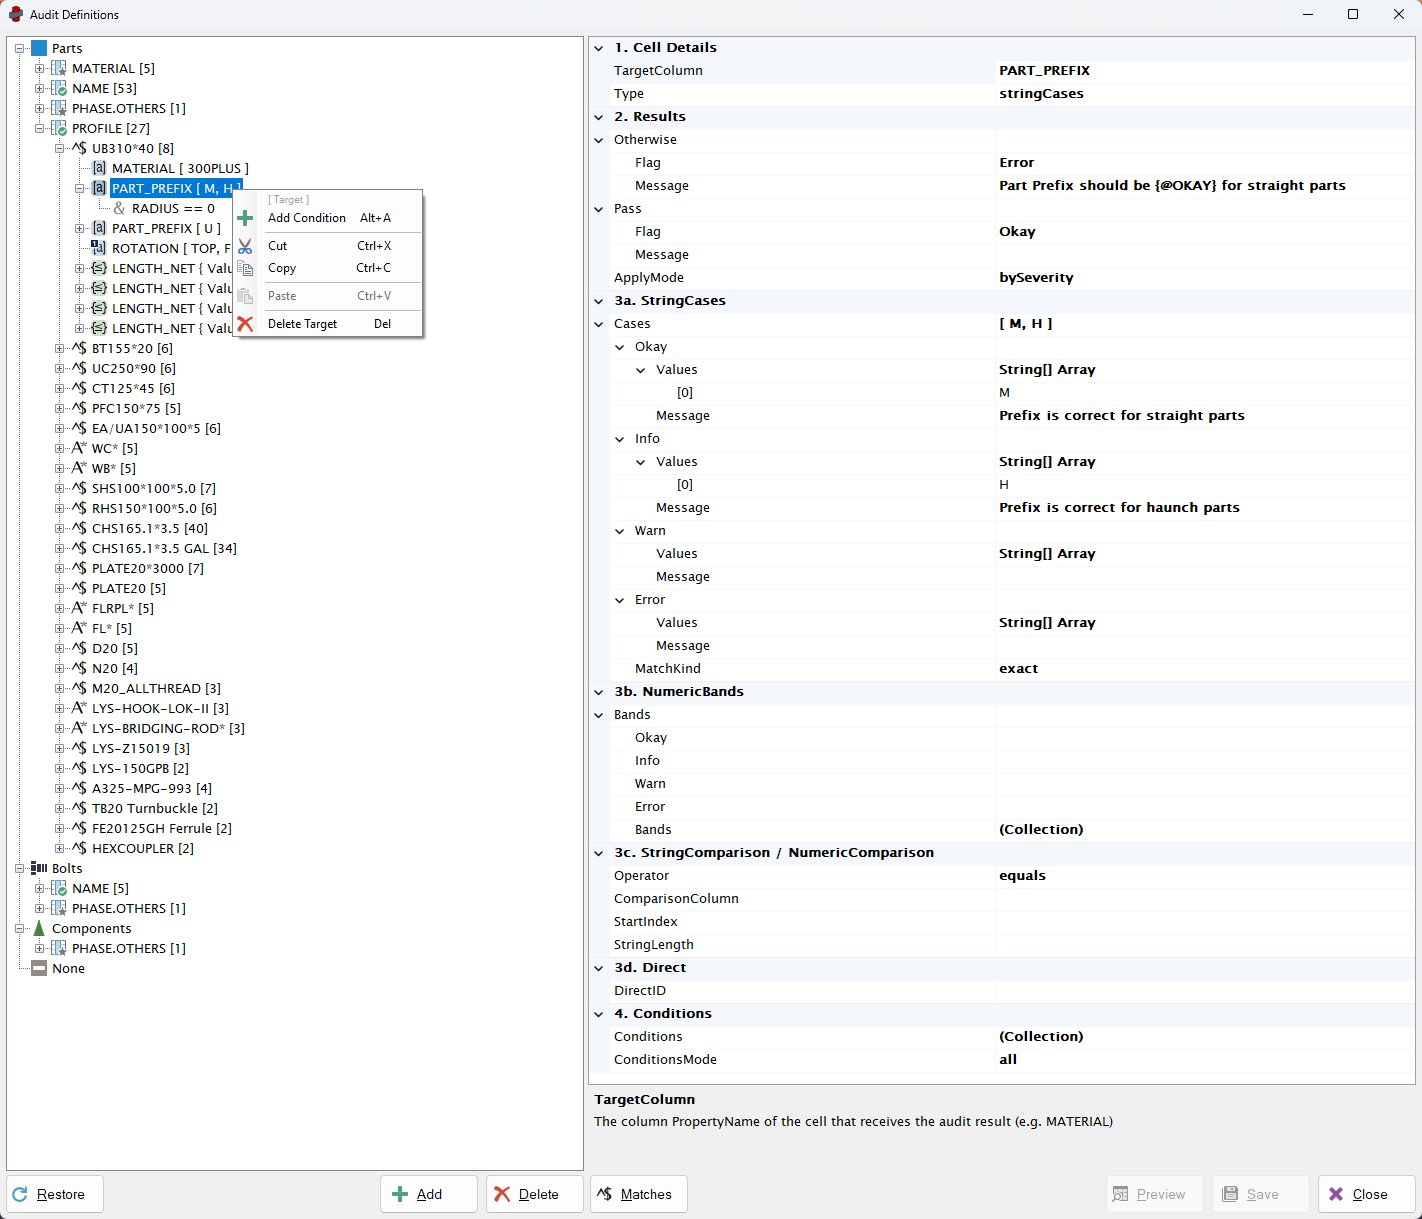
Target Nodes
Display:
- the target column
- the expected value or comparison
Icons differ depending on the target type:
| Icon | Value |
|---|---|
 |
StringCases |
 |
NumericBands |
 |
StringCompare |
 |
NumericCompare |
 |
Direct |
ApplyMode is also indicated:
| Icon | Value |
|---|---|
 |
onFirstMatch |
 |
onAnyMatch |
Condition Nodes
Condition nodes display the condition itself.
Icons differ depending on the ConditionMode of the parent target:
| Icon | Value |
|---|---|
 |
All |
 |
Any |
Property Grid
Selecting a node displays its properties in the Property Grid.
This panel allows all properties of the selected node to be edited.
Features include:
- dropdown lists for properties with fixed options
- editable text fields
- multi-line message fields
- numeric input controls
This is where flag severity and messages are defined.
These messages appear when a user clicks a cell in the main grid.
Editing Collections
Some properties contain collections of values.
Collections can be edited in two ways.
Using the Tree
Most collections are easiest to edit directly in the tree by adding child nodes.
Using the Collection Editor
Some collections are edited using the ... button in the property grid.
This opens a dialog window where items can be added or modified.
This method is required for:
- NumericBands
- Target → NumericBands → Bands
- String Arrays
- Target → StringCases → Values
- Condition → Right Comparison Value Array → Values
NumericBands are edited this way because individual bands do not have their own nodes.
Editing String Arrays
Properties that contain string arrays cannot be edited directly in the text field.
Instead, use the ... button to open the collection editor.
Multi-line text fields (such as flag messages) may be edited directly in the property grid.
Property Help Panel
The Help Panel displays a description of the currently selected property.
Selecting a property in the grid will show its explanation here.
The panel can be resized by dragging its boundary to increase or decrease the visible area.
Previewing Changes
After modifying rules, changes can be previewed.
Preview applies the current audit configuration to the main grid without saving.
This allows rules to be tested before committing them to file.
After previewing, you can either:
- Save the changes to file
- Revert to the previous configuration
Match Results Viewer
The Matches button opens the Match Results window.
When used with:
- selected rows in the main grid
- a selected node in the audit tree
the viewer displays match results for each selected row.
This includes:
- whether the Subject matched
- the results of Match nodes
- regex match groups
This tool is especially useful when developing or debugging regex-based rules.